Starting out in live video performance means choosing between clip mixing, visual node networks, and music-reactive software before you spend money on software or hardware. This guide explains how VJ software works, five beginner tools compared honestly, hardware setups, MIDI controllers, video formats, projection setup, and how to perform your first set without getting lost in complex node graphs.
How VJ software works: clips, nodes, and reactive visual synthesis
Visual jockeying (VJing) is the practice of creating, mixing, or manipulating imagery live in sync with music. In club settings, festivals, corporate launch events, and live concerts, a VJ controls what appears on venue projectors, LED walls, or stage displays behind the DJ or band. When you begin exploring VJ software, you will quickly discover that tools fall into three distinct architectural categories. Understanding these architectures helps you choose the right software for your specific artistic goals and technical comfort level.
The first category is clip-based mixing software. Tools like Resolume Avenue and 100VJ operate much like digital audio workstations or video editing software turned upside down. You import a library of pre-rendered video loops (usually MP4, MOV, or specialized VJ codecs like DXV or HAP), organize them into layers and decks, and mix them live using opacity faders, crossfaders, and real-time video effects. This approach is highly reliable for narrative or stylized visuals, as every video frame is pre-rendered and predictable. You can mix multiple layers of video, apply color filters, adjust playback speed, and trigger instant stings in sync with the beat.
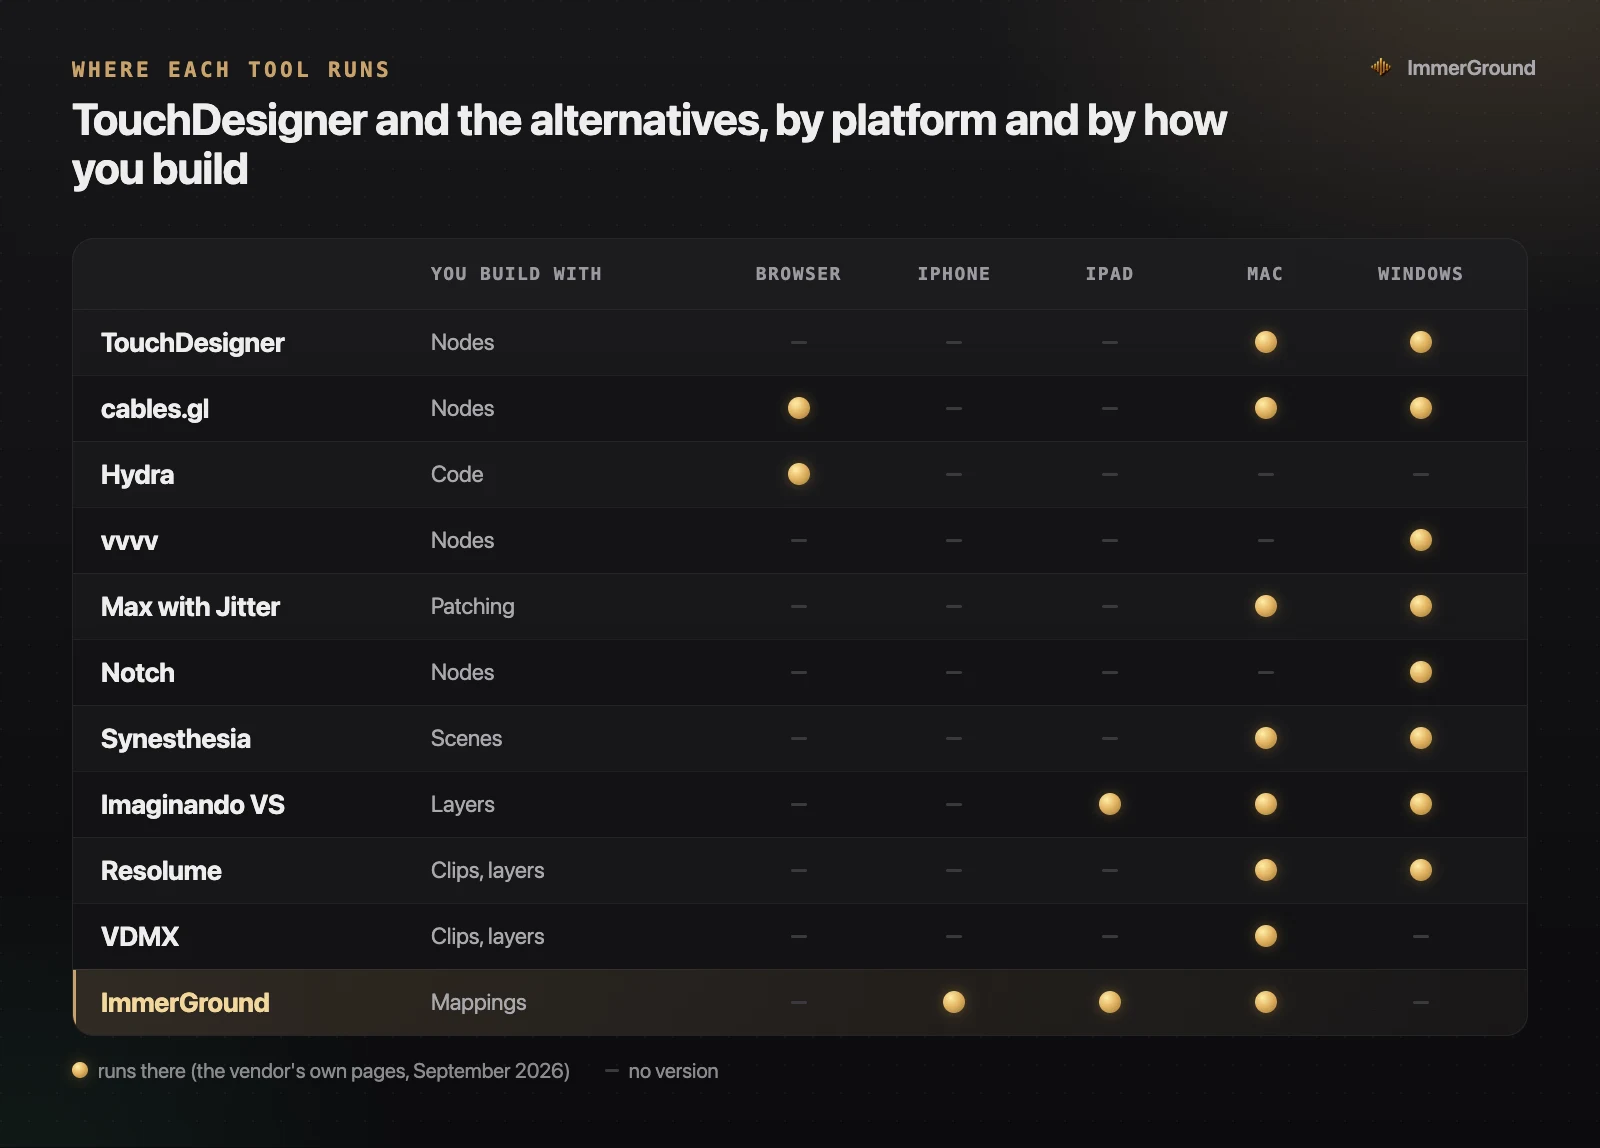
The second category is visual node-based generative programming environments, exemplified by TouchDesigner and cables.gl. Instead of playing back pre-rendered video clips, these environments generate 2D and 3D graphics in real time through networks of connected functional nodes. Operators process audio signals, construct 3D geometry, calculate lighting, and output dynamic frames on the fly. Node environments offer infinite flexibility, allowing you to build custom interactive systems, depth-camera tracking, and audio-reactive 3D shaders. However, node environments demand a steep learning curve and substantial computer processing power to run at high frame rates.
The third category is music-reactive visual software, which includes ImmerGround and Imaginando VS 2. These tools focus on direct audio-to-visual mapping without requiring complex node patching or huge storage drives filled with gigabytes of video clips. Audio input from a microphone, line-in, or song file is analyzed live into frequency bands, loudness, and beat transients. Those musical signals are then mapped directly to video parameters such as kaleidoscope folds, RGB splits, thermal heat LUTs, or motion tracking offsets. This approach allows solo performers and DJs to deliver complex, audio-synchronized visual sets with minimal setup time.
Choosing between these architectures depends on your performance style. If you want precise control over specific video artwork, clip mixing is the natural fit. If you want to build custom generative systems from scratch, node environments give you complete mathematical control. If you want your visual output to move organically with live sound without managing complex node wires during a performance, audio-reactive mapping software provides the ideal balance.
Hardware requirements for beginner VJs: laptops, tablets, and projectors
One of the most common misconceptions among beginner VJs is that you need a ten-thousand-dollar workstation to perform a live visual set. In reality, modern laptops, Apple Silicon iPads, and smartphones possess more processing power than high-end venue media servers had a decade ago. However, different software workflows place different demands on your hardware components.
For clip-based VJing, storage read speed and video decoding hardware matter most. Playing four simultaneous layers of 4K video clips requires a fast solid-state drive (SSD) with read speeds of at least 500 MB/s. Standard compressed video formats like H.264 require significant CPU power to decode multiple streams at once. Dedicated VJ codecs such as DXV 3 or HAP move the decoding workload directly to the GPU, allowing older laptops to play dozens of layers without dropping frames.
For node-based real-time 3D generation, GPU rendering speed and dedicated video memory (VRAM) are critical. If your GPU runs out of VRAM while rendering complex 3D meshes or shader effects, frame rates drop instantly. macOS laptops with Apple Silicon chips (such as M1, M2, M3, or M4) share unified memory directly between the CPU and GPU, making modern MacBooks and iPads exceptionally efficient at real-time graphics handling without requiring bulky desktop graphics cards.
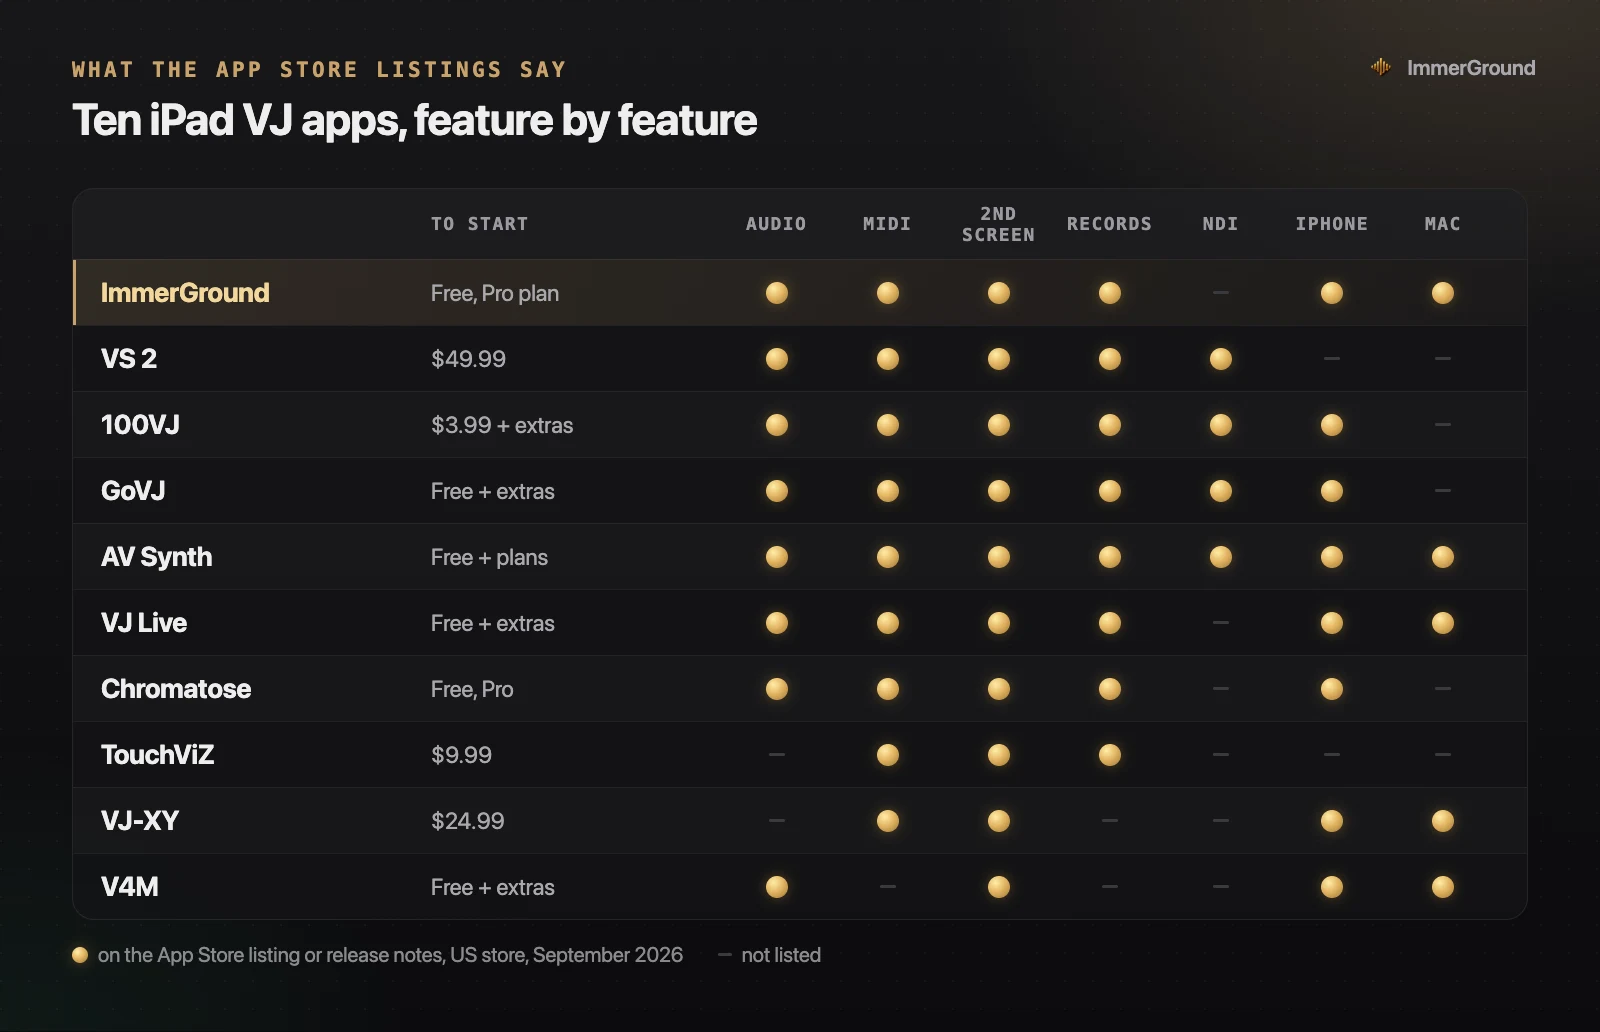
For mobile and iPad VJing, hardware connectivity is your primary consideration. An iPad Air or iPad Pro with a USB-C port can connect directly to a multi-port USB hub. This allows you to attach an HDMI cable for the venue projector, a USB MIDI controller for physical hands-on control, and a power cable to keep the device charged during a three-hour set. Using native mobile VJ apps eliminates the need to carry heavy laptops and power bricks to small club gigs.
Projectors and venue screens also require attention. Club projectors typically accept HDMI or DisplayPort connections. Standard 1080p projectors (1920x1080 pixels) are standard across most small venues, while larger venues and festival stages utilize 4K LED screens. Setting your VJ software to output a clean 1080p signal at 60 frames per second ensures smooth movement without overwhelming your playback hardware.
Five beginner VJ tools compared honestly
To help you decide which tool fits your budget and performance style, here is a detailed breakdown of five prominent VJ tools available in 2026. Each entry outlines what the tool does best, where its limitations lie, and its exact pricing structure.
| Tool | Workflow Type | Platforms | Audio Input | MIDI Support | Price |
|---|---|---|---|---|---|
| ImmerGround | Audio-reactive visual mapping | iPhone, iPad, macOS | Live mic, audio files (on a Mac, the selected sound input) | USB & Bluetooth MIDI | Free; Pro $6.99/wk or $39.99/yr |
| Resolume Avenue | Multi-layer clip mixing | macOS, Windows | Line-in, mic, FFT spectrum | USB & Network MIDI | €299 one-time per computer |
| TouchDesigner | Node-based visual network | macOS, Windows | Audio In CHOP, ASIO, FFT | MIDI In CHOP, OSC, DMX | Free up to 1280x1280; Commercial $600 (Educational $300) |
| 100VJ | Mobile clip & camera mixer | iOS, iPadOS | Mic, live camera, audio reactivity | USB & Network MIDI | $3.99 plus in-app upgrades |
| cables.gl | Browser node graph | Browser, macOS, Windows, Linux | Web Audio API, mic input | Web MIDI API | Free open-source web tool |
ImmerGround is designed for creators who want immediate audio-reactive visuals on iPhone, iPad, and Mac without building complex node networks. It takes sound from your device microphone, line input, or song files, analyzes it live into bass, mid, high, loudness, and beat triggers, and maps those signals directly to real-time video parameters. The app includes looks, glitch, motion and time effects (such as seven thermal looks, RGB split, ASCII, kaleidoscope, and motion tracking) and allows full USB or Bluetooth MIDI controller mapping. It is free to download on the App Store; ImmerGround Pro is $6.99 a week or $39.99 a year.
Resolume Avenue is the industry standard for traditional clip-based VJing on macOS and Windows. It excels at multi-column clip triggering, layer blending, and video effect stacking. The user interface is built around decks of video tiles, making it ideal for VJs who perform alongside live DJs for hours at a time. The software costs €299 per computer license. While Resolume Avenue does not run on iOS or iPadOS, it remains a top choice for desktop clip mixing setups.
TouchDesigner by Derivative is the premier node-based visual programming environment for macOS and Windows. It allows you to build custom 2D and 3D graphics, interactive installations, and complex generative systems using visual nodes connected by wires. The Non-Commercial version is free to download and output resolution is capped at 1280x1280 pixels. TouchDesigner offers complete creative freedom, but mastering its node operators requires months of dedicated study.
100VJ is an accessible mobile VJ app for iPhone and iPad created by Narumi Inada. It features video, image, and GIF channels, camera inputs, audio-reactive effects, and beat synchronization using microphone detection. It supports HDMI external displays up to 4K and Network MIDI control. Priced at $3.99 on the App Store with optional in-app purchases, 100VJ is a practical choice for iOS clip playback.
cables.gl is an open-source visual programming environment that runs directly inside your web browser. Similar to TouchDesigner, cables.gl uses a node graph where you connect operators to process textures, geometry, and audio inputs via the Web Audio API. Because it relies on WebGL and Web MIDI, you can build and test interactive visual patches on any computer without installing software.
Connecting audio and MIDI controllers for real-time control
Performing live visuals without physical controls can feel clumsy when relying solely on a laptop trackpad or touchscreen. Attaching a physical MIDI controller converts your software into a tactile instrument, enabling instantaneous visual cuts, smooth fades, and expressive effect tweaks during a live performance.
Grid controllers with pads (such as the Novation Launchpad Mini MK3 or Akai APC Mini MK2) are ideal for triggering clip changes, instant stings, and scene swaps. In software like ImmerGround or Resolume, each pad on an 8x8 grid can be mapped to trigger a specific visual effect, change an active clip, or jump between preset color LUTs. Physical pads allow you to tap along with the music in real time, creating sharp visual hits on kick drums or snare drops.
Rotary knobs and faders (such as the Korg nanoKONTROL2 or Novation Launch Control XL) are designed for continuous parameter adjustments. Knobs give you precise control over effect intensity, kaleidoscope rotation speed, or RGB split distance. Faders are essential for blending video layers, adjusting main opacity, or controlling global audio-reactive gain.
Setting up MIDI control in modern VJ software is straightforward thanks to MIDI Learn functionality. In ImmerGround or Resolume, you enable MIDI Learn mode, select the visual control on your screen (such as the Zoom or Strobe parameter), and turn a knob or press a pad on your hardware controller. The software instantly detects the incoming Continuous Controller (CC) or Note message and binds it to that parameter.
Wireless MIDI control over Bluetooth is another option for mobile VJ setups. iPad and Mac software support Bluetooth Low Energy (BLE) MIDI controllers, allowing you to control your visual set without running long cables across the booth table. For wired setups, standard class-compliant USB MIDI controllers plug directly into your laptop or USB-C iPad hub without requiring extra driver software installation.
Video codecs, formats, and resolution standards for live performance
Understanding video file formats is vital for maintaining high frame rates during a live show. Standard commercial video files downloaded from stock sites or rendered from editing programs are often optimized for small file size rather than live playback performance.
Standard MP4 video files use H.264 or HEVC (H.265) compression. These codecs use inter-frame compression, where only keyframes contain complete image data, while intermediate frames only store the differences between consecutive frames. When VJ software jumps rapidly between video clips or plays footage in reverse, your CPU must constantly decode surrounding frames to construct the requested image. This inter-frame decoding causes stuttering and dropped frames during heavy live performance.
Dedicated VJ codecs solve this performance bottleneck by using intra-frame compression, where every single frame is encoded as an independent, complete image. The two most widely used VJ codecs are DXV 3 (developed by Resolume) and HAP (an open-source GPU-accelerated codec). Because DXV and HAP files are decompressed directly by graphics card hardware, your VJ software can trigger dozens of video layers simultaneously without overburdening the system CPU.
When preparing your content library, convert your video loops to 1080p (1920x1080) or 4K (3840x2160) resolution at 30 or 60 frames per second. Ensure every clip loops cleanly without visible jumps between the final and initial frames. Keeping loop durations between 8 and 16 seconds provides enough visual variation while keeping project file sizes manageable.
Building your first VJ set step by step
Preparing for your first live VJ performance requires careful organization before you enter the venue. Following a structured preparation checklist ensures your performance runs smoothly without technical hitches.
Step 1: Gather and organize your content library. If you use clip-based software, organize your video loops into clear folders grouped by mood, color, or BPM. Keep clips short (10 to 20 seconds) and ensure they loop smoothly without visible visual jumps. If you use audio-reactive software like ImmerGround, organize your project scenes and background video clips so you can swap themes quickly during tempo changes.
Step 2: Establish your audio input source. Determine how audio will enter your software. In small clubs where access to the DJ mixer is limited, set your software input to the internal device microphone. Position your laptop or iPad near a booth monitor speaker so the software receives a clean, punchy audio signal. For larger venue setups, ask the sound engineer for a dedicated booth monitor feed or auxiliary line-in sent to your audio interface.
Step 3: Test your display output connections. Connect your computer or iPad to an external monitor or TV at home before the gig. On macOS and iPadOS, configure the display settings to extended desktop mode rather than display mirroring. Extended desktop mode allows your primary screen to display your VJ software controls and previews while sending a clean, unblemished video feed to the external display or venue projector.
Step 4: Prepare a blackout and emergency fallback. Always assign a dedicated hardware button or keyboard key to an instant Blackout function. If a video clip breaks, or if the stage lights go completely dark for a dramatic pause in the DJ set, pressing your Blackout key instantly clears your visual output to black. Having a clean fallback scene ready prevents static desktop screens or software interfaces from showing on the club walls.
Step 5: Pacing your visual performance. Avoid displaying your most intense visual effects, strobes, and rapid color shifts during the warm-up set. Match the energy of the music build-up: use subtle, atmospheric motion during intros and ambient sections, and hold back high-contrast flashes and fast kaleidoscope cuts for major drops and peak moments in the set.
Where to get free tools and loop packs for VJing
You can begin practicing VJing today using free web tools, free visual loops, and mobile applications:
- Free Live Audio Visualizer. Try audio-reactive visual mapping directly in your web browser at immerground.com/visualizer. Load a song file or enable your microphone, apply real-time thermal LUTs and kaleidoscope folds, and record 1080p clips, with a small immer ground mark and no account required. Entry-level browser testing is completely free. The ImmerGround app on iPhone, iPad, and Mac adds motion tracking, saved sessions and Render HD up to 4K; it is free to download, and ImmerGround Pro is $6.99 a week or $39.99 a year.
- Free VJ Loops Hub. Download free 4K and 1080p VJ loop packs at immerground.com/loops. All loops are BPM-tagged, rendered in high quality, and released under CC0 for commercial and personal use with zero email signups.
- Web MIDI Tester. Verify incoming MIDI signals from any USB or Bluetooth controller in your browser at immerground.com/tools/midi-tester before mapping controls in your VJ software.
What to do next
- Test your web audio setup. Open the free live visualizer on your laptop or phone, grant microphone access, and play a song to observe how bass and mid frequencies drive visual parameters.
- Download a set of CC0 VJ loops. Visit our free loop packs page and download 1080p or 4K loops to build your initial media library.
- Practice mapping a MIDI controller. Connect a USB pad or knob controller to your computer or iPad and use MIDI Learn to map physical controls to visual effects.
- Install ImmerGround on your Apple device. Get ImmerGround on the App Store for iPhone, iPad, or Mac to access advanced audio-reactive mapping, motion tracking, and 4K re-rendering.