The Video Engine in ImmerGround processes motion footage in real time to create audio-reactive visual performances. It decodes H.264 or HEVC clips, pushes the frame data to the Metal graphics pipeline, and applies live modulation based on audio analysis data like kick drum transients or high-frequency energy. This setup gives you direct control over video time, motion, and visual parameters, making it possible to sync pre-rendered 3D loops or live action footage tightly to a live DJ set, studio performance, or ambient installation.
Real-Time Motion Footage Processing Architecture
To manipulate video frames without dropping the overall frame rate of your performance, the architecture relies on strict isolation between decoding, audio analysis, and rendering. When you load a video clip into the app, the engine does not treat it as a standard static file playback.
Instead, it accesses the clip through an asset reader pipeline optimized for rapid frame extraction. The system pre-buffers a short sequence of frames in memory.
This buffer allows the engine to jump around in the video timeline instantly when you trigger a specific MIDI pad or when an audio transient fires. The decoding step happens on the dedicated hardware media blocks of the Apple Silicon or A-series processor.
264 and HEVC decoding to these blocks, the main CPU remains free to handle audio feature extraction and MIDI input processing. Once the hardware decoder outputs an uncompressed pixel buffer, the engine passes that buffer directly to the GPU via Metal textures.
The Metal shader pipeline then takes over. It applies your active mappings, altering color saturation, zooming into the frame, or distorting the pixel grid based on the incoming audio data.
This separation of concerns ensures that the audio analysis thread runs at a fixed, high-frequency interval. The kick detection, frequency band splitting, and transient calculation do not wait for a video frame to finish decoding.
They operate independently, continuously updating the control values. When the GPU is ready to render the next frame, it pulls the most recent control values from the audio thread and applies them to the current video texture.
If a sudden snare hit registers on the audio input, the corresponding visual flash or frame jump occurs on the very next screen refresh. You can monitor this process directly through the interface.
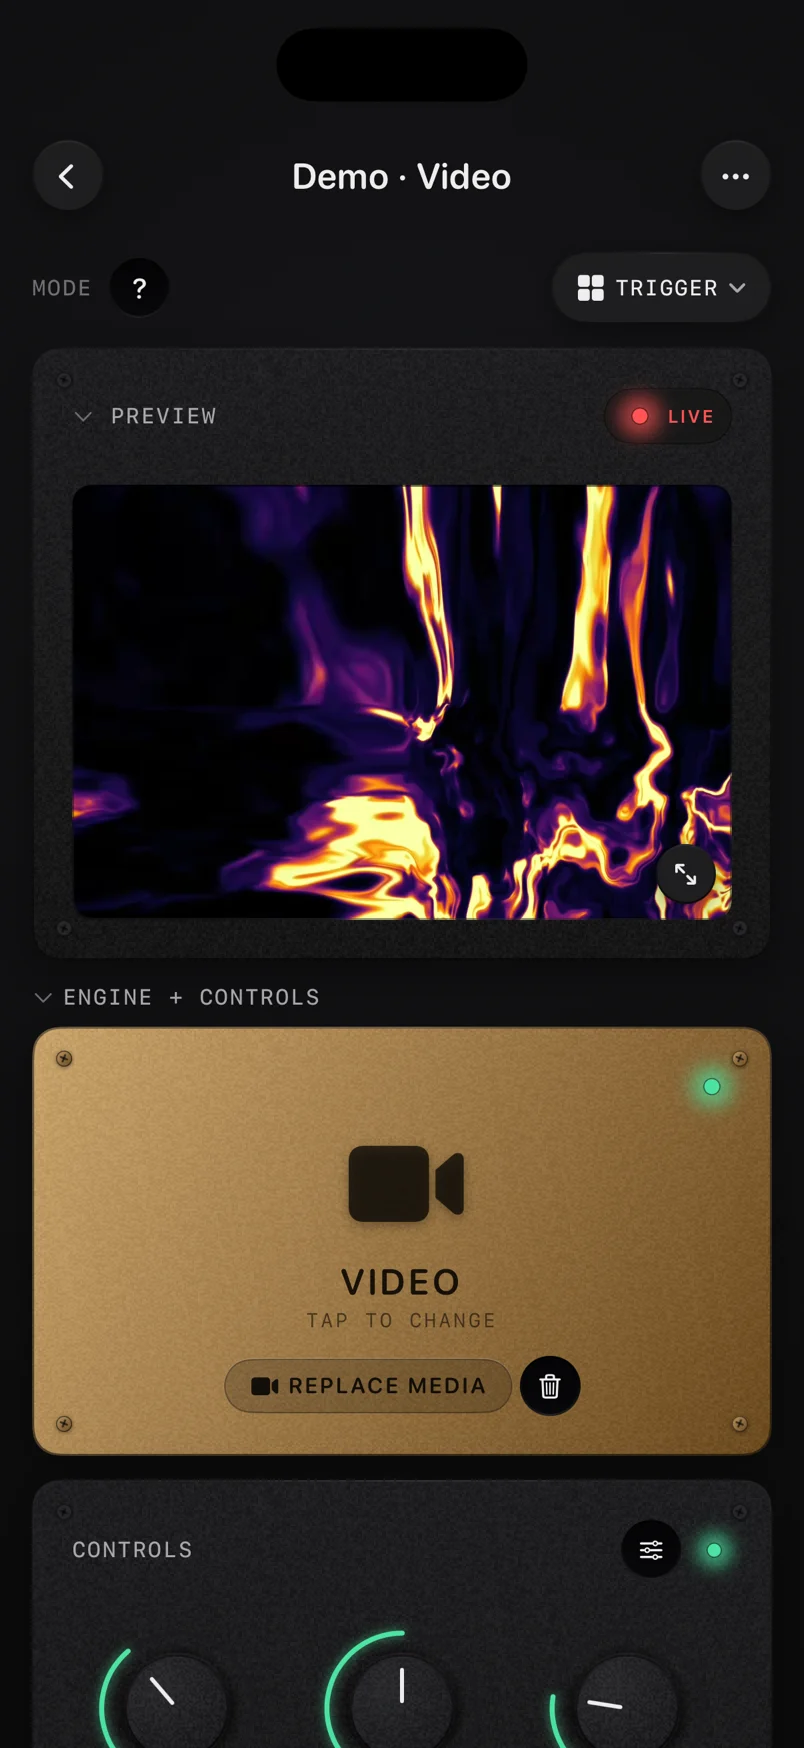
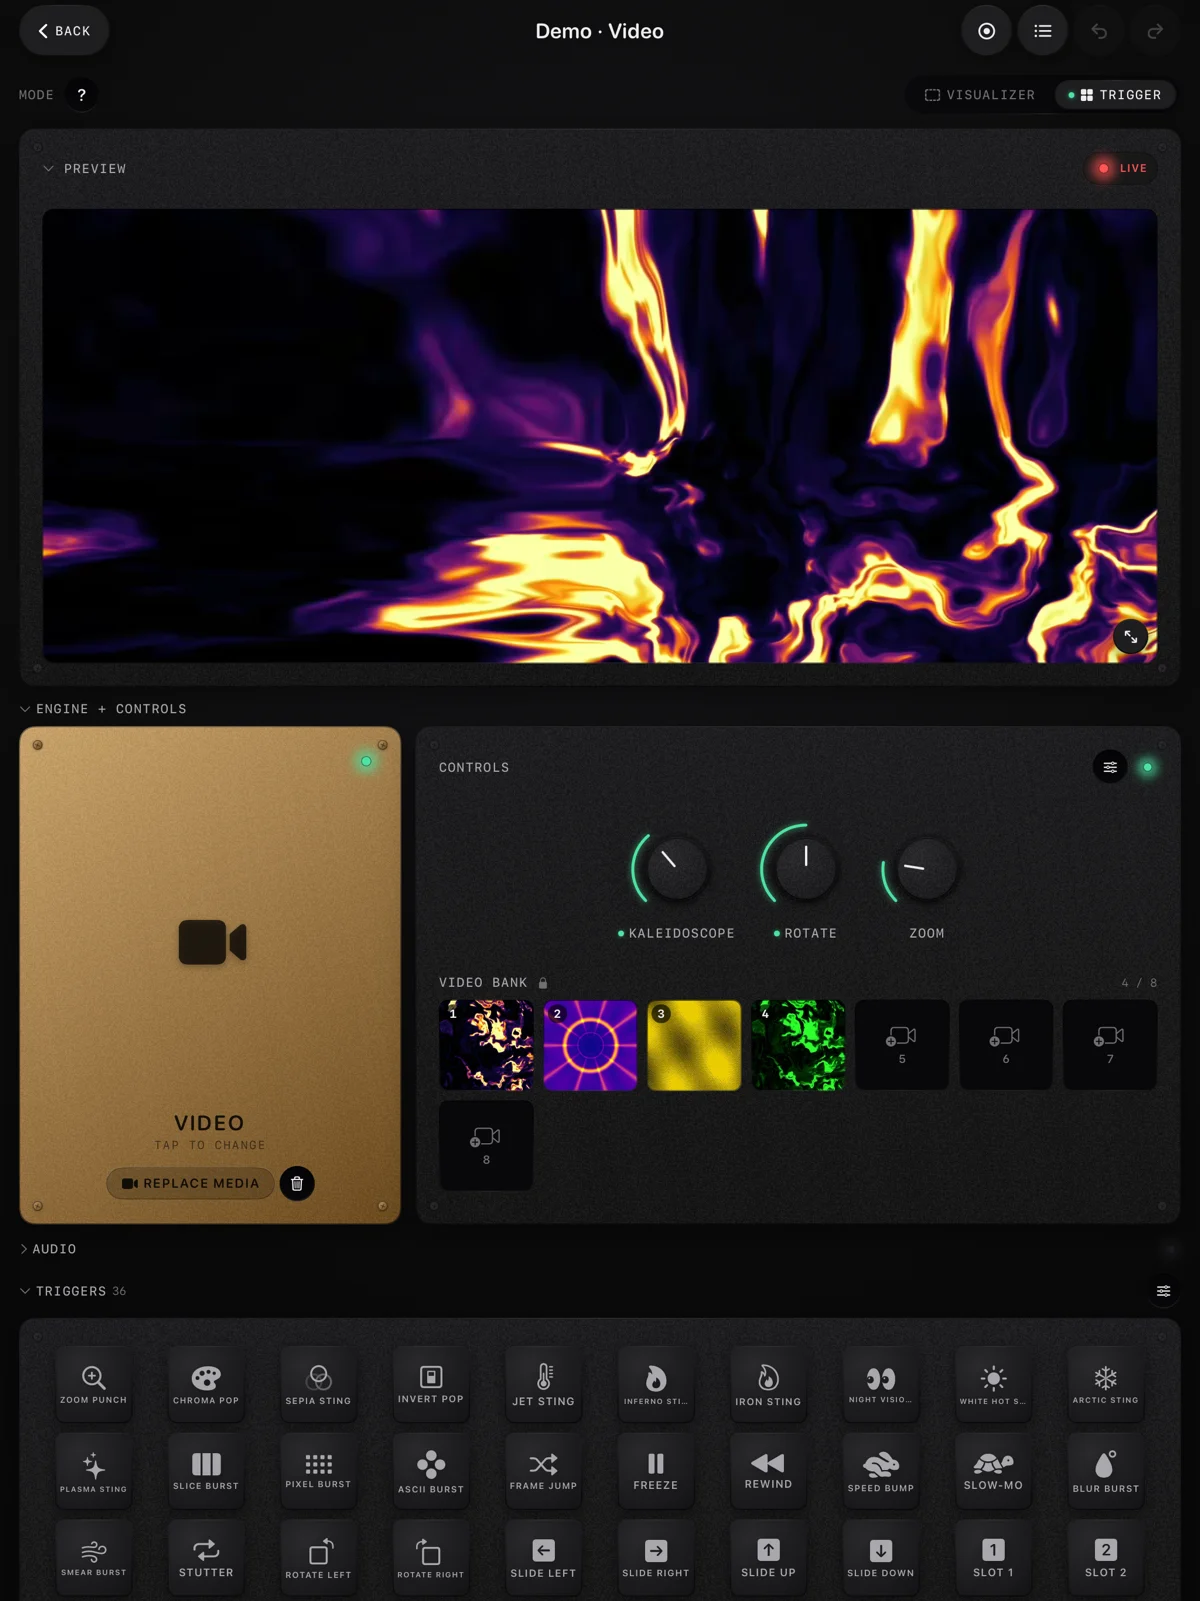
The live preview window shows the final rendered output. Below it, the Video engine tile provides access to the active parameters.
Video File Specs and Loop Preparation
Preparation of your source files dictates the stability and responsiveness of the live output. The engine expects specific formatting to maximize performance and visual quality.
Resolution, frame rate, and codec choice all affect the memory footprint and the speed at which the engine can apply audio-reactive modifications. Resolution scaling requires memory bandwidth.
A 4K video file contains four times the pixel data of a 1080p file. While modern Apple hardware can decode multiple 4K streams, manipulating a 4K texture in real time with multiple audio-reactive shaders will consume more GPU cycles.
For many club performances, a 1080p source file upscaled by the output display device provides a stable balance between sharpness and rendering speed. If your final output is a massive LED wall that demands pristine native 4K pixels, you must manage your shader complexity accordingly.
Frame rate selection impacts the smoothness of time-based modulation. A 60 fps source clip allows for much smoother slow-motion effects when you map a low-frequency oscillator to the playback speed.
A 30 fps clip might show stuttering if you slow it down too much, as the engine will duplicate frames to fill the time. However, a 30 fps file is smaller and decodes faster.
Choose the frame rate based on the specific aesthetic you want and the capabilities of your device. Loop boundaries must be exact.
If you are using pre-rendered 3D tunnels or abstract motion graphics, the first frame and the last frame must match perfectly. When the engine reaches the end of the clip, it loops back to the beginning.
Any mismatch in position, color, or lighting at the boundary will create a visible jump. Align your video loops to a strict musical grid, such as a 32-beat cycle at a specific BPM, before importing them.
This alignment makes it easier to synchronize the visual motion with the tempo of the live audio.
| Parameter | Recommended Target | Alternative Option | Impact on Performance |
|---|---|---|---|
| Resolution | 1080p (1920x1080) | 4K (3840x2160) | 4K increases memory usage and shader load significantly. |
| Frame Rate | 60 fps | 30 fps | 60 fps gives smoother time modulation but requires more decode cycles. |
| Codec | HEVC (H.265) | H.264 | HEVC offers better quality at smaller file sizes but requires hardware decode support. |
| Container | .mp4 or .mov | N/A | Both are fully supported by Apple asset reader pipelines. |
| Bitrate | 15 to 25 Mbps | Up to 50 Mbps | High bitrates look cleaner but take more storage and memory bandwidth. |
When you create content specifically for live manipulation, test the files thoroughly. Load the clip, map the audio input to extreme parameter values, and watch for frame drops.
If you see stuttering, compress the file again with a lower bitrate or reduce the resolution. A smooth, responsive 1080p performance always looks better than a lagging 4K output.
Audio Modulation of Video Time and Motion
The core utility of the Video Engine lies in its ability to tie visual motion directly to audio events. Static playback is uninteresting.
By linking the audio analysis outputs to the video parameters, the footage becomes a live instrument. You can control the speed, direction, and frame position based on the volume, frequency content, or transient hits of the incoming sound.
Time modulation alters the playback speed of the clip. You can map the overall audio level to the speed parameter.
When the music is quiet, the video crawls forward slowly. When a loud chorus drops, the video speeds up rapidly.
This technique works exceptionally well with footage of driving, flying, or moving through tunnels. The visual velocity matches the musical intensity.
You can also map specific frequency bands to speed. Routing the high-hat frequencies to playback speed makes the video stutter and jump forward with every fast, percussive hit.
Frame jumping allows for aggressive, rhythmic editing without requiring pre-cut clips. You can map a hard kick drum transient to a parameter that forces the video to jump forward or backward by a specific number of frames.
Every time the kick fires, the video glitches to a new position. If you use a clip with distinct visual sections, this creates an instant, audio-driven montage.
You can combine this with direction control. Map a heavy bass note to reverse the playback direction momentarily.
The footage plays forward during the verse, but stutters backward rhythmically during the bass drops.
- Speed Bumps: Map the mid-range frequencies to playback speed. As synth chords swell, the video accelerates smoothly.
- Stutter Cuts: Map sharp transients to frame position. The video flashes to random frames with every snare hit, creating a chaotic, high-energy effect.
- Reverse Playback: Map the low-end volume to a direction toggle. A sustained sub-bass note pulls the footage backward until the note releases.
- Directional Slides: Map an external MIDI knob or expression pedal to the exact frame position. You can scratch the video back and forth manually, just like a DJ scratching a record.
To build a complex visual response, you layer multiple mappings. You might route the kick drum to a zoom effect, the snare to a color inversion, and the overall volume to playback speed.
The interaction between these mappings creates a dense, complex visual that feels entirely organic and tied to the audio.
Video Engine vs Image Engine Considerations
You must decide when to use the Video Engine and when to use the Image Engine. Both accept audio modulation, but they handle data differently and impose different demands on the hardware.
Understanding these differences helps you build stable, efficient performance setups. The Image Engine loads a single static image into memory as a texture.
Once loaded, the memory footprint remains constant. The CPU does not have to decode new frames.
The GPU simply applies shaders to that same texture 60 times per second. This approach is highly efficient.
You can load a high-resolution 4K or 8K image, apply complex audio-reactive distortions, and run the output on an older iPhone without dropping frames. The motion comes entirely from the shader math: displacing pixels, rotating the image, or shifting colors based on the audio.
The Video Engine, conversely, requires continuous decoding. Every frame must be extracted from the compressed file, moved from CPU memory to GPU memory, and then processed.
This constant stream of data consumes battery power, generates heat, and uses memory bandwidth. If you load four 1080p video clips into a bank and switch rapidly between them while applying heavy audio modulation, you stress the entire system architecture.
Aesthetic goals dictate the choice. The Video Engine is necessary when you need narrative motion, real-world footage, or complex pre-rendered 3D animations that cannot be simulated with shaders.
If your performance requires footage of city streets, dancing crowds, or specific character animations, you must use video. The Image Engine is better suited for abstract, geometric, or highly distorted visuals where the source material serves merely as a color palette or texture map for the shader effects.
Many complex setups use a hybrid approach. You might run a clean video clip on one layer, and then use the Image Engine to generate an audio-reactive mask or overlay on top of it.
This distributes the processing load and combines the specific benefits of both engines.
Hardware Requirements for Video Playback
Stable video performance requires capable hardware. While the app runs on a wide range of Apple devices, the limitations of the processor, thermal design, and unified memory directly dictate how much video processing you can do before the frame rate drops.
Apple Silicon M-series chips (M1, M2, M3, M4) on Mac and iPad Pro offer massive advantages for the Video Engine. 264 streams rapidly with minimal CPU overhead.
The unified memory architecture means that once the video frame is decoded, the GPU can access it instantly without copying data across a PCIe bus. An M2 iPad Pro or Mac Studio can comfortably handle multiple 4K video streams, apply audio-reactive mappings, and output a stable 60 fps signal to an external display.
This makes them ideal for demanding club environments and professional stage setups. A-series chips on iPhones (A15, A16, A17 Pro) are highly capable but face thermal constraints.
An iPhone 15 Pro can run complex video setups, but sustained processing over a two-hour DJ set will generate heat. The phone may throttle its processor speed to manage the temperature, leading to dropped frames or sluggish responsiveness.
To mitigate this, keep the iPhone cool. Avoid placing it in direct sunlight or under hot stage lights.
Use a stand that allows air to circulate around the back of the device. If you use an iPhone for a long set, stick to 1080p clips and monitor the device temperature.
Memory allocation is critical. When you load video clips into the app, the system pre-allocates memory for the decoding buffers.
Devices with 8GB or 16GB of unified memory handle large video banks easily. Older devices with 4GB of RAM may struggle if you attempt to load too many high-resolution clips simultaneously.
The OS will begin paging memory to storage, causing severe latency and stuttering when you switch clips.
| Device Category | Example Models | Video Capability | Best Use Case |
|---|---|---|---|
| M-Series Mac (Desktop/Laptop) | Mac Studio, MacBook Pro M3 | Multiple 4K streams, heavy effects | Main stage visual control, VJ booth, studio rendering. |
| M-Series iPad | iPad Pro M2, iPad Air M1 | Dual 4K or Multiple 1080p streams | Portable performance, direct touch control, DJ booth integration. |
| A-Series iPhone Pro | iPhone 15 Pro, iPhone 14 Pro | Single 4K or Dual 1080p streams | Minimalist setups, run-and-gun visuals, short sets. |
| Older A-Series iPhone/iPad | iPhone 12, iPad 9th Gen | Single 1080p stream, light effects | Testing, practice, ambient displays, low-complexity visuals. |
External hardware connectivity also matters. You will need a reliable USB-C hub to connect a MIDI controller, route the audio interface for precise sound input, and output the HDMI signal to the projector or LED wall.
Ensure your hub supports 4K at 60Hz over HDMI. Many cheap hubs only support 4K at 30Hz, which will ruin the fluidity of your 60 fps video loops.
Managing Video Banks During Live Shows
A live visual set requires continuous evolution. Staring at a single video loop for an hour bores the audience.
You must swap clips, change scenes, and introduce new visual elements as the music progresses. The Video Engine manages this through a bank system designed for instant recall and low-latency switching.
The interface allows you to load up to four distinct video clips into a single active bank. These four slots remain pre-loaded in memory.
You can switch between them instantly by tapping the corresponding slot on the screen or pressing a mapped button on a MIDI controller. When you trigger a new slot, the engine immediately routes that video to the rendering pipeline.
The audio mappings remain active, applying the same kick drum zoom or snare flash to the new footage. This 4-slot system encourages structured performances.
You might assign Slot 1 to a calm, ambient loop for the breakdown of a track. Slot 2 holds an energetic, fast-moving clip for the buildup.
Slot 3 contains a highly abstract, glitchy loop for the main drop. Slot 4 serves as a utility clip, perhaps a plain color or a logo loop.
By jumping between these slots in time with the music, you create a dynamic visual narrative. To expand beyond four clips, you use the browser file system to load new banks.
While one clip is playing, you can navigate the folder structure, select a new set of videos, and prepare them for the next phase of the show. Loading new files takes a brief moment as the engine initializes the asset reader and fills the buffers.
Do this during quieter moments in the set to avoid any potential performance hiccups. For complex setups, map a MIDI grid controller (like a Novation Launchpad or Akai APC) to the clip selection slots.
This allows you to manage the video bank entirely by touch, without looking at the device screen. You can keep your eyes on the crowd, listen to the audio, and fire off new video clips exactly on the beat.
Where to get free visual tools
You need strong source material and precise audio data to make the Video Engine perform well. The visualizer and mapping tools require proper setup and clean loops to generate compelling results.
Use these resources to build your sets, test your connections, and prepare your files before heading to the venue.
- Web Visualizer: Use the browser-based visualizer to test your video loops against your audio tracks. This tool runs directly on your computer, allowing you to quickly check loop boundaries and experiment with basic mappings before moving the files to your performance device.
- BPM Finder: Accurate tempo is required for tight video sync. Use the BPM finder to calculate the exact tempo of your backing tracks or DJ set. You can use this data to calculate the exact length in frames for your 32-beat video loops.
- MIDI Tester: Complex hardware setups demand verified routing. Use the MIDI tester to confirm that your knobs, faders, and pads are sending the correct CC and Note data before you attempt to map them to video clip selection or playback speed.
- Free Loops: Start building your video banks with curated, pre-formatted content. Download the free VJ packs from the loops page. These files are optimized for real-time manipulation, encoded efficiently, and cut to exact musical grids.
What to do next
To master the Video Engine, you must move beyond static playback and begin actively performing your visuals. Follow these steps to build a reliable, audio-reactive video setup.
- Format your video assets. Encode your loops to 1080p HEVC at 60 fps to ensure smooth playback and low memory usage on mobile devices.
- Load a bank of four distinct clips. Choose loops with different energy levels (slow, fast, abstract, literal) to cover various phases of a music track.
- Map the audio input to video time. Route the main volume to playback speed, and route the kick transient to a frame jump parameter to create instant rhythmic stuttering.
- Connect a MIDI controller. Assign four pads to the clip selection slots, allowing you to swap footage instantly on the downbeat.
- Test your hardware limits. Run your setup for 30 minutes with full audio mapping active, monitoring your device for heat throttling and frame drops. Adjust your resolution or shader complexity if necessary.
- Route the output to a projector. Use a reliable USB-C to HDMI adapter, verify the 60Hz connection, and run a live test to ensure the visual latency matches the audio transients.
The Video Engine provides a direct link between sound and moving image. By preparing your files carefully and understanding the hardware architecture, you can turn standard video clips into an aggressive, responsive visual instrument.