ImmerGround allows you to snapshot your entire visual output state into Pad Scenes, providing instantaneous recall of clips, effects, and modulation parameters during live performances. By mapping these stored states to MIDI controllers or touchscreen pads, you can trigger massive visual shifts on exact downbeats without manually adjusting individual knobs in the moment.
Pad Scenes Concept and State Management Architecture
The state management architecture in ImmerGround revolves around capturing the active render pipeline variables at a specific moment in time. When you create a Pad Scene, the engine records a comprehensive snapshot.
This snapshot includes the active video clip or still photo, the current playback position, the loop points, the active effect slots, and the specific modulation values applied to those effects. The system stores these variables in memory, ready for immediate deployment.
Understanding this architecture helps when designing a live visual set. ImmerGround does not simply load a new file from storage when you trigger a scene.
Instead, it holds the media assets in RAM and updates the parameter matrices. This method prevents visual stutters and avoids the latency penalty of reading from a solid state drive during a set.
The rendering engine maintains a constant frame rate, usually 60 frames per second on modern iOS, iPadOS, and macOS hardware, because the state change only involves swapping numeric values in the processing chain. The parameter state map includes several categories of data.
First, the media state defines the source material. Second, the spatial state defines scale, rotation, and translation parameters.
Third, the color state controls hue shifts, saturation, brightness, and contrast. Fourth, the effect state stores the specific combinations of distortion, pixelation, or displacement mappings currently active.
All these categories merge into a single payload when you snapshot the output.
| Parameter Category | Stored Variables | Memory Impact | Recall Speed |
|---|---|---|---|
| Media State | Active clip ID, playback head, loop start, loop end | High (Requires media in RAM) | Instant (Frame 0) |
| Spatial State | Zoom level, X offset, Y offset, Z rotation | Minimal (Float values) | Instant (Frame 0) |
| Color State | Hue offset, saturation multiplier, brightness, contrast | Minimal (Float values) | Instant (Frame 0) |
| Effect State | Active slots, dry/wet mix, modulation depth, speed | Moderate (Shader compilation if new) | Instant (Frame 0) |
When you trigger a Pad Scene, the engine processes the parameter payload and applies it to the active render target. If the scene requires a new video clip, the system pulls the pre-loaded asset from the RAM buffer.
If the scene adjusts effect parameters, the numeric values update instantly before the next frame draw call. This architecture ensures that visual changes hit exactly on the beat, tracking tightly with audio input or MIDI triggers.
Memory management requires careful planning when working with multiple Pad Scenes. Since ImmerGround keeps assets ready for immediate recall, large video files consume device RAM.
An iPad Pro with 8GB or 16GB of RAM can hold dozens of high-resolution video clips in active memory. An older iPhone might struggle if you pack a scene bank with 4K ProRes files.
264 or HEVC for live playback, and keep file sizes small by trimming clips to just the essential looping segments.
Creating and Saving Pad Scenes
Building a scene bank involves preparing visual states and committing them to specific pads in the ImmerGround interface. The workflow starts in the main mixing view.
You load a clip, apply a strobe effect, adjust the color grading to match the mood of the track, and link the scale parameter to the microphone input for audio reactivity. Once the visual output looks exactly right, you assign this state to an empty pad.
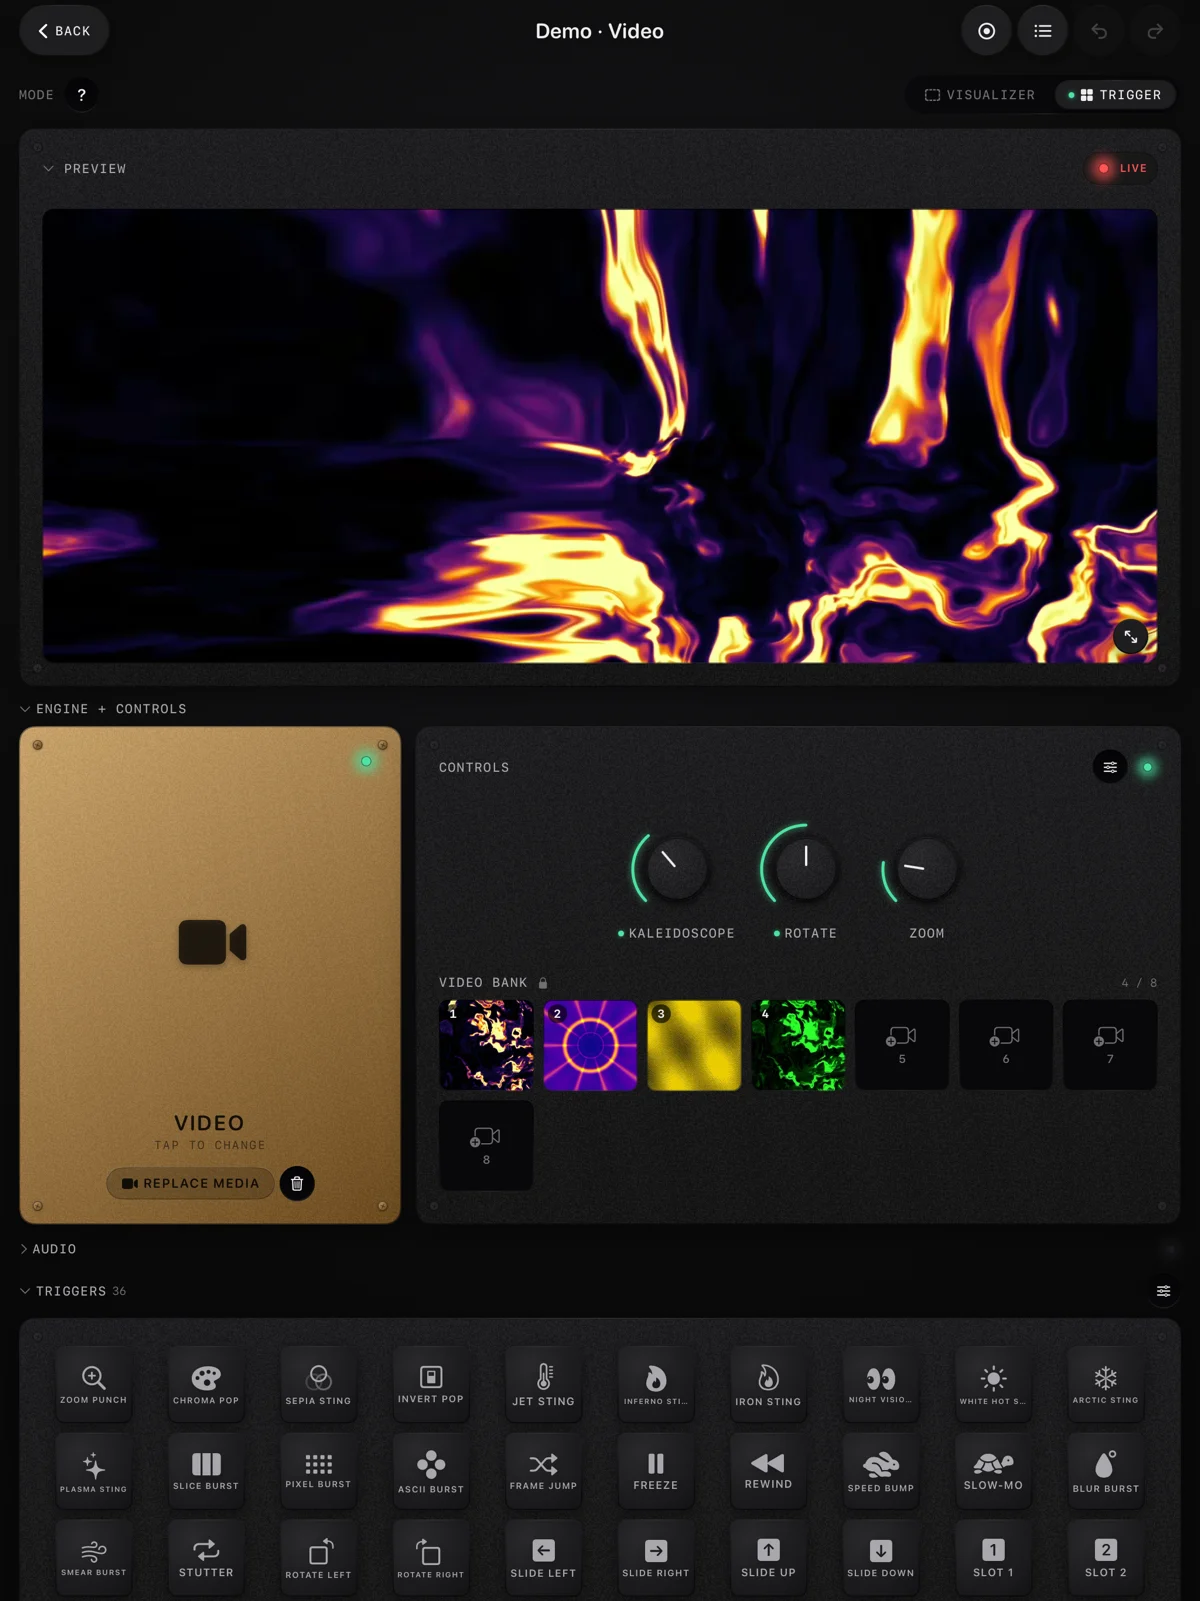
The standard layout provides a grid of pads, often organized in banks of 16 or 36, depending on your device screen size and interface preferences. To save a scene, you typically press and hold an empty pad until the system registers the snapshot.
The pad will light up or change color, indicating that the parameter payload is now stored. You can then modify the current visual output to build the next scene.
- Asset Preparation: Import clips into your project and assign them to channels before building scenes.
- Parameter Dialing: Fine-tune every effect knob, color wheel, and audio-reactive threshold to achieve the exact look.
- Snapshot Action: Long-press or use a dedicated save button to capture the state to a specific pad location.
- Naming Conventions: Assign clear, descriptive names to your pads (e.g., Red Strobe Drop, Blue Ambient Build) to avoid confusion during a show.
- Grid Organization: Group related scenes together. Place build-up states on the top row and drop states on the bottom row for logical access.
Organizing your scene bank logically is critical for live execution. A random arrangement of pads makes it impossible to find the right visual cue under the stress of a live performance.
Most visual artists organize their grids chronologically, following the structure of their setlist, or categorically, grouping scenes by color palette or energy level. For a DJ set, a categorical approach works best.
You might dedicate the left side of the grid to low-energy, atmospheric visuals for the beginning of the night or the breakdowns between tracks. The center columns might hold medium-energy clips with moderate audio reactivity.
The right side of the grid should contain the high-energy, aggressive scenes used for the drops and peak moments. This spatial organization allows your hands to find the right intensity level without looking at the screen.
When working on macOS, you can use a mouse and keyboard to build scenes rapidly, utilizing screen real estate to view all parameters simultaneously. On an iPad, the touch interface allows for simultaneous multi-finger parameter adjustments before hitting the save pad.
On an iPhone, the process requires more menu navigation, but the fundamental snapshot logic remains identical across all platforms.
Instant Recall and Crossfade Dynamics
Triggering a Pad Scene forces the visual output to adopt the stored parameters. The immediate switch is the default behavior.
When you tap a pad, the video clip swaps, the colors shift, and the effects engage precisely on the frame of the tap. This instant recall maps perfectly to hard transients in electronic music, such as a kick drum hit or a sudden synth stab.
If you map the pads to a MIDI controller, you can play the visual scenes like a drum machine. However, an instant cut is not always the desired visual result.
Ambient music, long melodic builds, or smooth transitions require a gradual shift between visual states. ImmerGround handles this through interpolation logic.
While the core engine performs instant parameter swaps, you can apply envelope transition times to specific scenes or to the global output. When you set a transition time, the system calculates the delta between the current parameter values and the stored values in the target scene.
It then generates a curve over the specified duration. For a color shift from blue to red over two seconds, the engine gradually adjusts the hue values across 120 frames (at 60fps).
This interpolation creates fluid, evolving visuals without manual knob twisting.
| Transition Type | Trigger Action | Visual Result | Best Use Case |
|---|---|---|---|
| Hard Cut | Tap pad (0ms transition) | Immediate asset swap and parameter shift | Drops, heavy beat hits, rhythmic flashing |
| Quick Fade | Tap pad (250ms transition) | Smooth but fast blending between states | Phrasing changes, vocal entrances, snare rolls |
| Long Crossfade | Tap pad (2s to 10s transition) | Slow, atmospheric morphing of visuals | Ambient sets, intro sequences, deep breakdowns |
| Parameter Glide | Tap pad (Custom curve) | Assets swap instantly, but effects fade in | Building tension before a major visual drop |
Managing the crossfade dynamics requires hardware planning. If you use an iPad touchscreen, you can tap the pads directly.
If you use a hardware MIDI controller, you can assign different transition times to different buttons. You might map the top row of your controller to trigger scenes with a slow crossfade, and the bottom row to trigger the exact same scenes with a hard cut.
This setup provides massive flexibility during a live show. The audio-reactive engine also respects the transition envelopes.
If Scene A has a low audio reactivity threshold and Scene B has a high threshold, a slow transition will gradually increase the visual response to the audio input. This creates a rising sense of energy that perfectly mirrors a musical build-up.
Project Files and Preset Exporting
A scene bank is only useful if you can retrieve it exactly as you left it. ImmerGround encapsulates the entire state of your visual setup, including media references, effect chains, MIDI mappings, and Pad Scenes, into a single project file.
Saving this project file is the most critical step in preparing for a gig. A complete project file ensures that when you plug into the club projector, your visuals load exactly as they did in your studio.
The project file format is lightweight because it primarily stores text-based parameter data and file paths. It does not duplicate your heavy video files unless you explicitly choose to package them.
When saving a standard project, ImmerGround records the file paths to your media assets. If those assets remain in their original locations on your device, the project loads instantly.
If you move the assets, the project will prompt you to locate the missing files. For cross-device deployment, you must manage your media assets carefully.
If you build a project on your Mac and want to perform with your iPad, you cannot simply transfer the project file. You must also transfer the media files and ensure they reside in a location the iPad can access.
The best practice is to create a dedicated folder for each performance, containing both the ImmerGround project file and all associated video clips.
- Local Saving: Save your project locally on the device for rapid access during rehearsals and gigs.
- Cloud Backup: Store a copy of your project files on iCloud Drive, Dropbox, or a similar service as a fail-safe.
- Media Packaging: When transferring between devices (macOS to iPadOS), transfer the entire folder containing media and the project file via AirDrop or a USB-C drive.
- Preset Export: Export individual scene banks as presets to share with other ImmerGround users or to build a library of visual states for future projects.
- Version Control: Save sequential versions of your project (e.g., Club_Set_v1, Club_Set_v2) during the design phase to avoid losing a perfectly balanced state.
The ability to run the exact same project on iOS, iPadOS, and macOS provides immense flexibility. You can spend hours on a Mac carefully adjusting color values on a large monitor, then AirDrop the project to your iPhone, walk to the venue, connect the phone to the projector via a USB-C to HDMI adapter, and perform the set holding the phone in your hand.
The render engine guarantees that the visual output matches the studio monitor, restricted only by the capabilities of the hardware projector. When working with external hardware, remember to save the MIDI mappings within the project.
A complex scene bank is useless if the MIDI controller triggers the wrong pads. ImmerGround saves the MIDI CC assignments, note values, and channel settings inside the project file, ensuring that your specific controller works the moment you load the set.
Structuring Live Performance Cue Sheets
A successful visual performance requires structure. Hitting random pads might look acceptable for a few minutes, but a compelling hour-long set demands a narrative arc.
Structuring a live performance cue sheet involves planning the sequence of visual states to match the emotional journey of the music. You translate this cue sheet into the physical layout of your Pad Scenes.
Start by breaking down the musical set into distinct phases. A typical club set includes an intro, several cycles of build-ups and drops, extended breakdowns, and an outro.
You need specific visual scenes for each phase. The intro requires atmospheric, slowly evolving visuals to establish the mood.
The build-ups demand rising intensity, perhaps through increasing strobe rates or audio reactivity. The drops require explosive, high-contrast, fast-moving clips.
The breakdowns need a return to calm, often stripping away complex effects to reveal a clean, dark aesthetic. Map these phases to your pad grid.
A 36-pad layout offers enough space for a comprehensive set. You might dedicate columns 1 and 2 to intro and breakdown scenes.
Columns 3 and 4 hold the build-up scenes, featuring heavy modulation and rising tension. Columns 5 and 6 contain the drop scenes, packed with aggressive flashes, glitch effects, and high-energy media assets.
Consider the color narrative of the set. A visual performance that flashes random colors constantly quickly fatigues the audience.
Use color intentionally. You might start the set with deep blues and purples in the intro scenes.
As the energy builds, transition to reds and oranges. Save pure white strobes and intense yellows for the peak moments of the night.
By assigning specific color states to specific columns of pads, you can manage the color narrative logically. Hardware controllers enhance the cue sheet execution.
If you use a controller like the Novation Launchpad or an AKAI APC, you gain tactile feedback. You can label the physical buttons or use the controller's LED colors to represent the different sections of your cue sheet.
Blue buttons for breakdowns, red buttons for drops. This physical mapping removes the need to stare at the screen, allowing you to watch the crowd and react to the DJ's track selection.
Prepare utility scenes for unexpected moments. A DJ might pull the music entirely, or the audio signal might drop.
Having a blackout scene assigned to an easily accessible pad acts as a safety mechanism. Pressing the blackout pad instantly kills the visual output, preventing an awkward frozen frame or inappropriate visuals during a silent moment.
Managing Complex Live Show Transitions
Moving between scenes requires precision. In a live environment, a mistimed button press or a sudden shift in visual style can ruin the immersion.
Managing complex live show transitions involves using the tools within ImmerGround to mask state changes, blend media smoothly, and maintain visual momentum regardless of what the music does. One technique involves using a master effect bus to unify scenes during a transition.
If you are switching from a calm, blue geometric scene to a chaotic, red footage scene, a hard cut might jar the audience. Instead, map a heavy blur or a full-screen pixelation effect to a separate knob or fader.
As the DJ builds the track, push the fader up to obscure the current scene. When the drop hits, trigger the new scene and simultaneously slam the fader down to reveal the sharp, new visuals.
The heavy effect masks the exact moment of the cut. Layering multiple instances of ImmerGround or using the built-in blending modes offers another approach.
If your hardware supports it, you can run two separate visual layers. You keep Layer A running the current scene, load the upcoming scene onto Layer B in the background, and then use a crossfader to blend between the two.
This mimics a traditional DJ mixer workflow and allows for long, smooth transitions between entirely different visual states.
- Effect Masking: Use heavy blur, feedback, or brightness drops to obscure the screen during a scene swap.
- Rhythmic Switching: Trigger scene changes exactly on the quarter notes or eighth notes to make the hard cuts feel intentional and musical.
- Color Bridging: If Scene A is blue and Scene C is red, create a bridging Scene B that contains purple elements to smooth the color transition.
- LFO Sweeps: Map a Low Frequency Oscillator to the scale or rotation parameters and trigger the scene change at the peak of the sweep.
- Audio Threshold Triggers: Set the engine to only execute the scene change when the audio input crosses a massive threshold (like a heavy sub-bass hit), ensuring the visual change aligns with the audio impact.
Preventing visual drops is critical. A visual drop occurs when the screen goes black unintentionally, usually because a media file failed to load, a cable disconnected, or a software crash occurred.
ImmerGround minimizes software drops by loading assets into RAM, but hardware issues remain a threat. Your primary defense is a reliable setup.
Use high-quality USB-C hubs, certified HDMI cables, and ensure your iPad or Mac has adequate cooling. Implement a scene backup strategy.
If you rely heavily on complex, audio-reactive scenes, build a few simple, non-reactive scenes that use solid colors or basic generative patterns. Map these backup scenes to a separate bank on your controller.
If the audio input fails or the complex scene glitches, you can instantly switch to the backup bank, keeping visual movement on the screen while you troubleshoot the primary issue. When performing with an iPhone, the risk of interruption increases due to phone calls or notifications.
Always activate Airplane Mode and Do Not Disturb before starting a set. A notification banner appearing on the main club screen destroys the professional atmosphere.
Treat the iOS device as a dedicated visual instrument during the performance, locking down all external communications.
Where to get free visual tools
Building a compelling visual set requires strong assets and the right utilities. You need sources for video loops, tools to measure the tempo of the music, and software to verify your hardware connections.
We provide several resources to support your visual performances. First, explore the core visual generator.
If you need abstract, mathematically driven patterns that respond to audio, launch the Web Visualizer. This tool runs directly in the browser and provides a fast way to experiment with color combinations and audio reactivity before committing them to your ImmerGround project.
Second, gather high-quality media. A great visual set relies on excellent source material.
You can download curated, performance-ready video clips from our Loops Archive. These files are optimized for playback and loop perfectly, saving you hours of editing time.
Third, ensure your timing is exact. Visuals must lock to the audio tempo.
If you struggle to match the speed of your effects to the track, use the BPM Finder. Tapping along with the music on this tool provides an accurate Beats Per Minute reading, which you can then input into the ImmerGround timing engine.
Fourth, verify your hardware. Complex MIDI setups often fail because of bad cables, incorrect channel routing, or driver issues.
Before you blame the software, test your controller using the MIDI Tester. This utility confirms that your hardware sends the correct control change and note messages to your device.
What to do next
You now understand the architecture of Pad Scenes, the strategies for building a performance cue sheet, and the techniques for managing live transitions. The next phase involves applying this knowledge to your specific hardware setup and preparing for your next gig.
Follow these exact steps to integrate ImmerGround into your live workflow.
- Open ImmerGround on your primary device (Mac, iPad, or iPhone) and create a new project named "Live_Set_Alpha".
- Import ten short, optimized video loops into the media pool and assign them to the primary channels.
- Build an "Intro" scene on the top-left pad. Apply a slow rotation effect, a blue color tint, and set the transition time to 3 seconds.
- Build a "Drop" scene on the bottom-right pad. Assign a fast-paced clip, apply a strobe effect linked to the audio input, and set the transition time to instant (0ms).
- Connect a MIDI controller to your device. Map the physical pads on the controller to the virtual pads in ImmerGround using the MIDI learn function.
- Connect an audio source to the device input. Play a track and practice triggering the Intro scene, waiting for the musical build, and then slamming the Drop scene on the beat.
- Save the project file locally. Connect an external display via HDMI and run the setup again to verify the output resolution and frame rate on the projector.