A music visualizer is the cheapest way to give a track a video on YouTube: the song, a picture that moves with it, and no film shoot. The hard parts are not the ones the template sites talk about. They are how long a video you can actually make for free, what YouTube does to your upload, and what happens when the music is not yours. This guide covers what makes a visualizer worth watching, YouTube's own upload settings, how copyright and Content ID treat visualizer videos, a free way to make a clip in your browser, three ways to make one for a whole song or a long mix, how to do it in After Effects or DaVinci Resolve, a checklist before you upload, and where the usual advice goes wrong.
What makes a visualizer worth watching
A visualizer that moves at random is a screensaver with a song attached. The ones people watch make the music visible: the kick pushes the picture, the snare hits something, the drop changes everything. That comes from mapping specific parts of the sound to specific movements, not from a busier template. Our guide to a visualizer video for your song covers those mappings in detail; this guide is about getting the result onto YouTube.
Three things matter more on YouTube than anywhere else:
- The first five seconds. Viewers decide fast. Start the video on a moment where the picture already moves, not on a slow fade-in over silence.
- The picture itself. A photo of the artist, the cover art or footage from a shoot gives the video an identity that a generic waveform does not.
- The thumbnail and title. Visualizer videos all look alike in search results. A clear still and a title that names the artist and track do more than any effect.
Choosing the picture
The picture carries more of the video than the effects do. Cover art is the obvious choice and a good one, because it ties the video to the release and looks right as a thumbnail. A photo of the artist works when it has a clear subject against a darker background, which gives zooms and colour effects something to act on. Footage from a shoot or a performance is the strongest, because it moves on its own and the effects add to that motion. Whatever you pick, test it with the loudest part of the song first: a picture that looks good when still can turn into mush under a hard-hitting chorus.
Mapping ideas by genre
- House and techno. The kick is on every beat, so a small zoom on the bass gives a steady pulse; save the big effect for the drop.
- Hip hop. The snare carries the groove; a flash or a frame jump on the snare reads better than constant motion on the bass.
- Drum and bass. The drums are fast; map the bass to slow movement and let the highs drive quick colour splits, so the picture feels the half-time weight.
- Ambient and piano. No hard beats at all; map loudness to a slow colour shift or a gentle zoom across whole phrases.
YouTube's own upload settings, and what they mean for a visualizer
YouTube publishes its recommended upload encoding settings, and they are worth following because YouTube re-encodes everything you upload. The main points from its help page:
| Setting | YouTube's recommendation |
|---|---|
| Container | MP4, with the index at the front of the file (Fast Start) |
| Video codec | H.264, High Profile, 4:2:0 |
| Frame rate | The rate you recorded at; common rates include 24, 25, 30, 50 and 60 |
| Bitrate, 1080p (SDR) | 8 Mbps at 24 to 30 fps; 12 Mbps at 48 to 60 fps |
| Bitrate, 1440p (SDR) | 16 Mbps at 24 to 30 fps; 24 Mbps at 48 to 60 fps |
| Bitrate, 4K (SDR) | 35 to 45 Mbps at 24 to 30 fps; 53 to 68 Mbps at 48 to 60 fps |
| Audio | AAC-LC or Opus, 48 kHz, stereo at 384 kbps |
| Shape | 16:9 is the standard on a computer; the player adapts to vertical and square |
Two limits catch people with long mixes. YouTube's help page says the maximum is 256 GB or 12 hours, whichever is less, and that uploads are limited to 15 minutes by default until you verify your account. If your one-hour mix fails to upload, verification is usually why. Shorts are a separate format: YouTube's page defines them as up to three minutes long, square or vertical.
For visualizers specifically, the frame rate matters more than the resolution. Fast, beat-driven motion looks noticeably smoother at 60 frames a second than at 30, and YouTube's recommendations support 60 at every resolution.
Copyright: whose music is it?
This is the part that decides whether your video stays up. YouTube's help pages explain the system plainly.
- Content ID claims are automatic. When an upload matches a recording in YouTube's Content ID system, a claim is placed. Depending on the rights holder's settings, it can block the video, put ads on it with the money going to the rights holder, or simply track its views, and the action can differ by country.
- A claim is not a strike. YouTube says claims usually do not affect your channel. Strikes come from formal removal requests. With a claim you can do nothing, remove or replace the claimed audio, share revenue if you are in the Partner Program, or dispute it.
- Credit is not permission. YouTube's myths page is direct: giving credit, having bought the song, writing "no infringement intended" or not monetising the video does not give you the right to use it.
- The Audio Library is safe. YouTube's Audio Library offers royalty-free music that is not claimed through Content ID and can be used in monetised videos; its Creative Commons tracks need an artist credit in the description.
Visualizers for DJ mixes
A DJ mix is the hardest case, because it contains many recordings you do not own. Each one can be matched by Content ID, and each rights holder's settings apply, so a mix can collect several claims with different outcomes in different countries. A visualizer does not change that: the claim is on the music, not the picture. If you post mixes, expect claims, and read each one in YouTube Studio before deciding what to do.
So a visualizer for your own track is straightforward, a visualizer for a track you love but do not own will usually be claimed, and a visualizer for a track from the Audio Library is safe. If you are an artist whose music is released through a distributor, YouTube may already have an Art Track for it: an automatically generated video of the recording with its cover art, created from the label or distributor's delivery. A visualizer is a way to give that track a richer video of your own.
Free in your browser: a clip in minutes
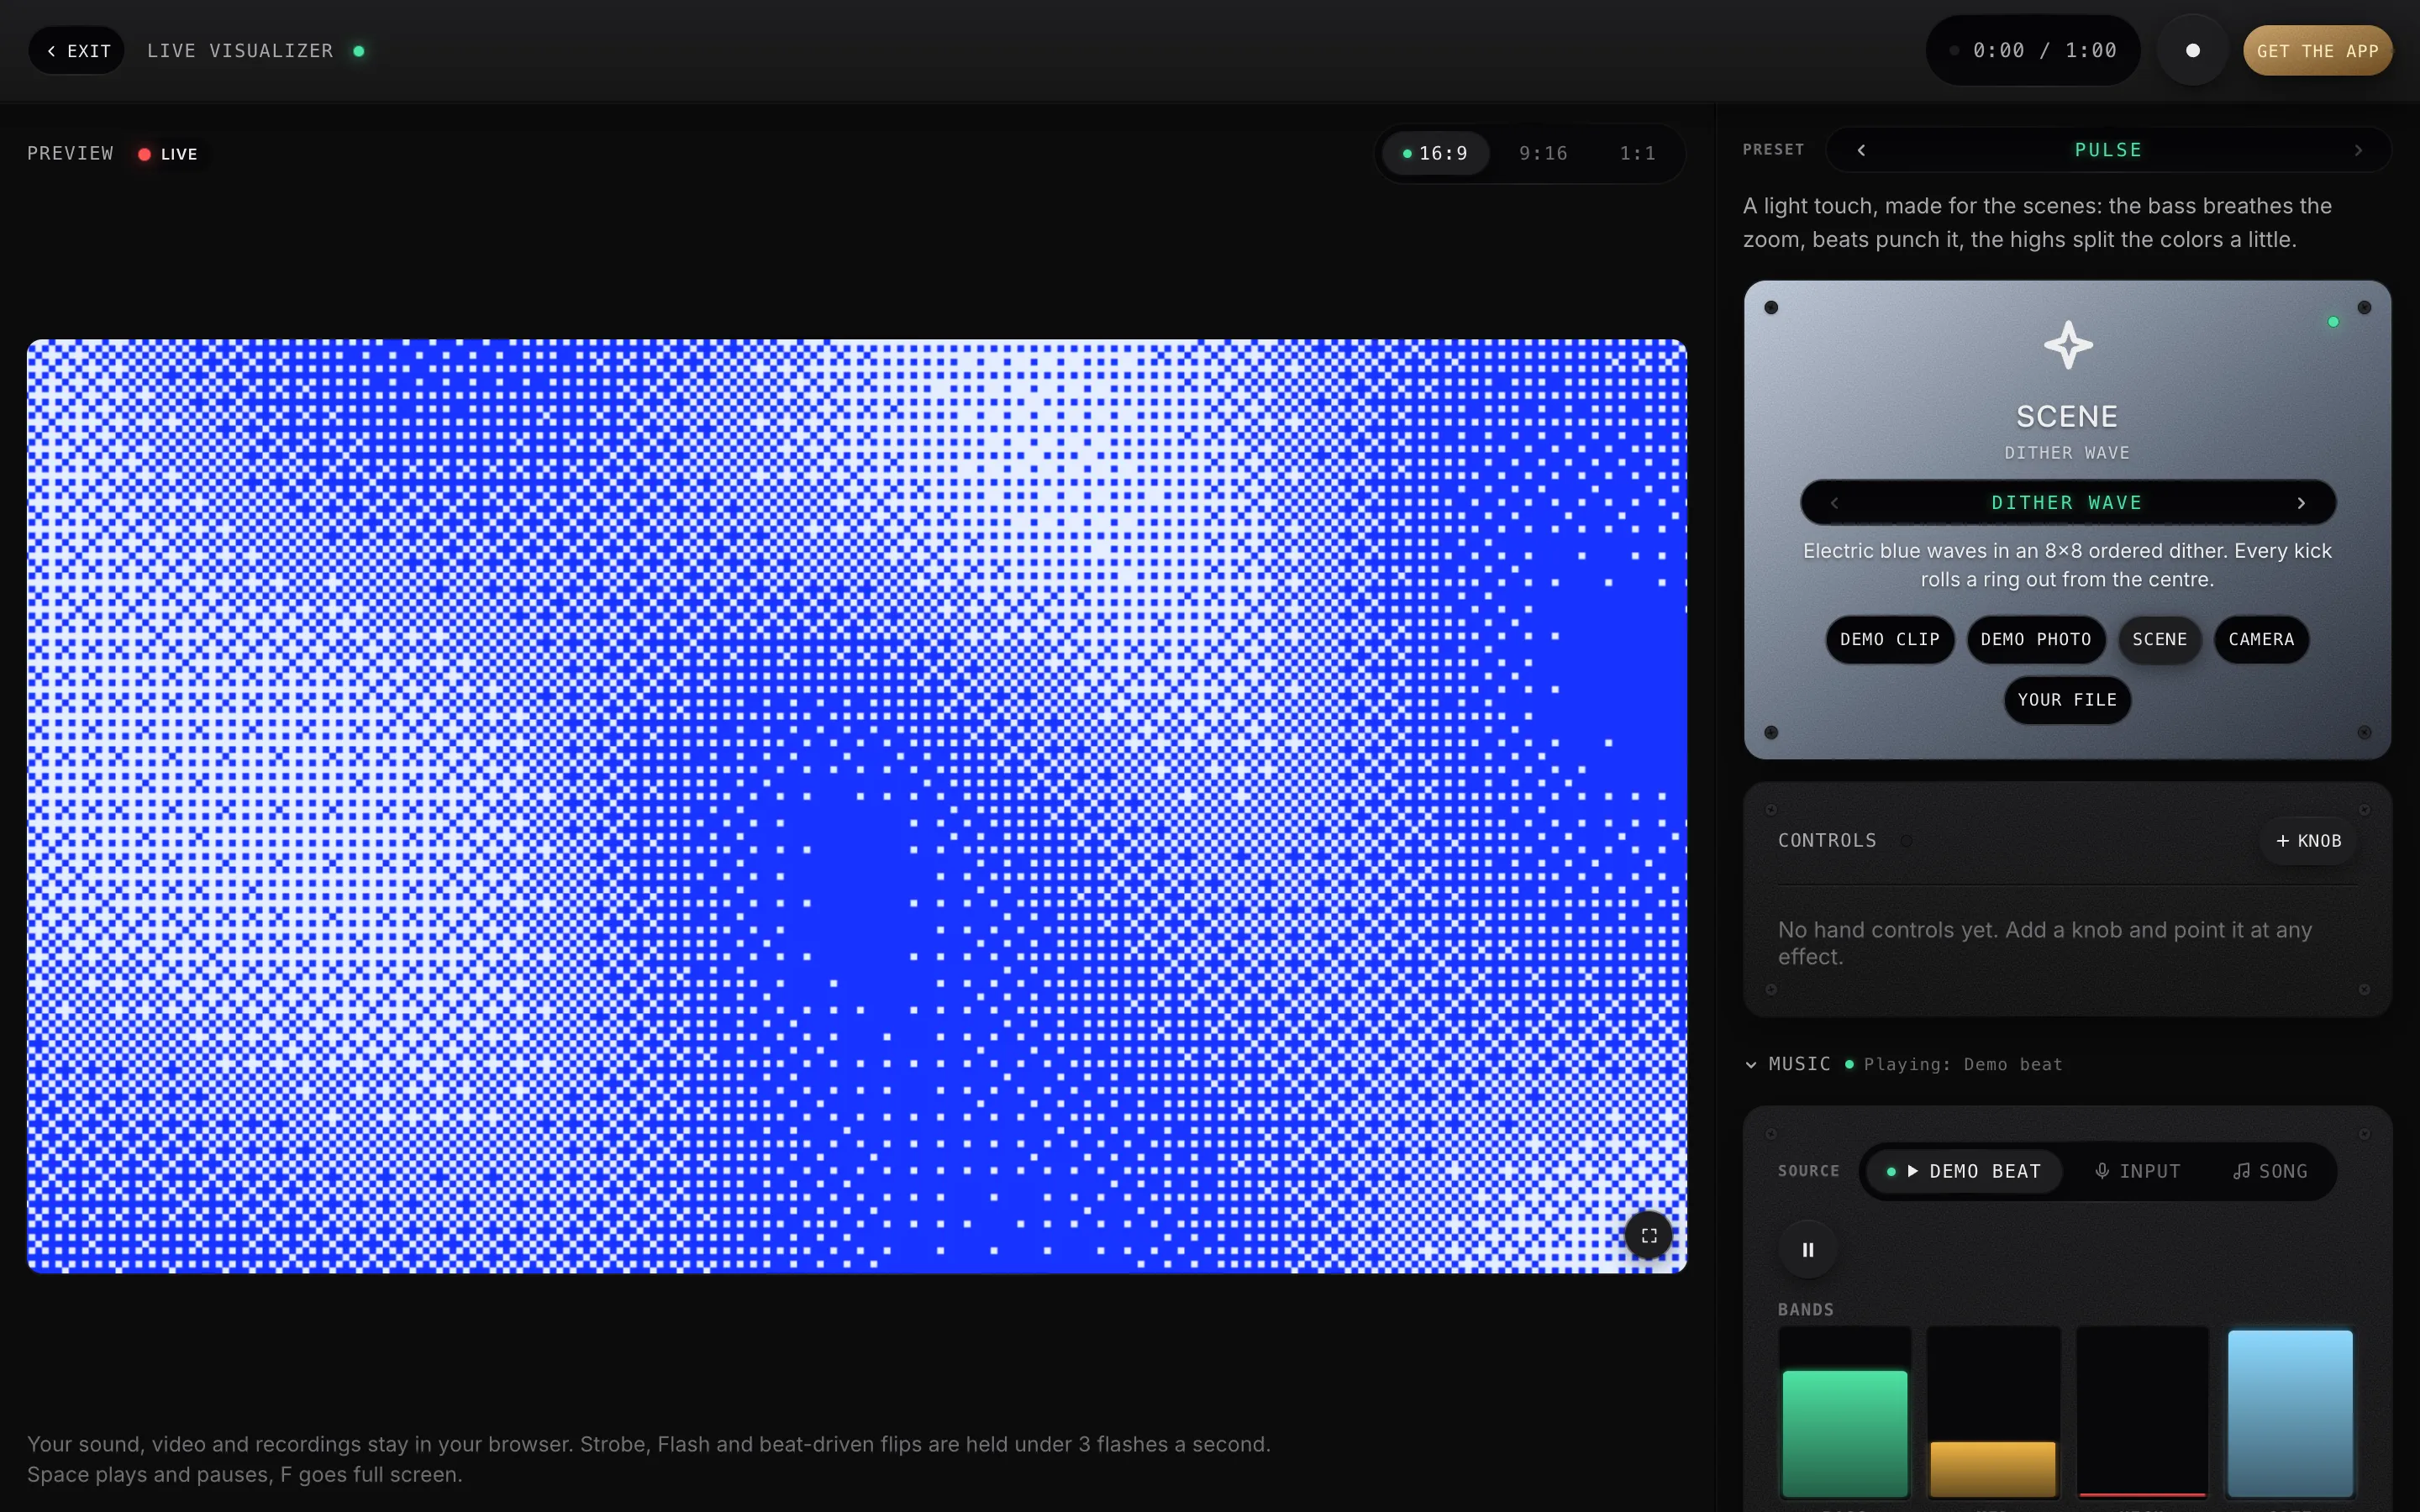
For a Short, a teaser or a first test, our free live audio visualizer makes a video in the browser, and nothing you load is uploaded.
- Load the song as a file. A file gives the cleanest, most repeatable result.
- Pick the picture. Your cover art, a photo, a clip, or one of the scenes drawn in code.
- Pick a preset, then adjust the mappings. Bass to a zoom, the beat to a flash, the highs to a colour split is a strong start.
- Choose the frame and record. 16:9 for a YouTube video, 9:16 for a Short. Recordings run up to 60 seconds at up to 1080p, as MP4 where the browser supports it, with a small immer ground mark in the corner.
Use the 60 seconds on the strongest part of the song. The chorus or the drop gives the effects the most to react to, and it is the part a viewer should see first in a Short or a teaser. Record two or three takes with different mappings and keep the one where the picture lands hardest on the hits.
Sixty seconds covers a Short, a chorus for a teaser, or the hook of a track for social posts. It does not cover a full song, and that is the next section.
When you need the whole song: three routes
Most free tools stop well short of a full track, let alone a mix. These are the realistic ways to get a visualizer for the whole thing.
Route one: record a session and re-render it
Our app, ImmerGround, for iPhone, iPad and Mac, records every session: play the whole song into it, from the file, with your mappings running and MIDI pads for the big moments, and it saves the session as it happened. Render HD then re-renders it at 720p, 1080p, 1440p or 4K, at 30 or 60 frames a second, always in 16:9, which is exactly the shape YouTube wants. It is free to download, and ImmerGround Pro is $6.99 a week or $39.99 a year. One caveat from our own notes: in video projects, the source clip plays in real time during the render and can drift slightly from the effects, so check the render against the audio before uploading.
Route two: capture a visualizer with OBS
OBS Studio is free and open source for Windows, macOS and Linux, and it can record any window on screen, so any visualizer that runs on your computer can be captured for as long as the song lasts. On current Macs, OBS's own documentation recommends its macOS Screen Capture source rather than the older window capture, and it can record the audio too. OBS recommends recording to MKV, because a crash does not corrupt the whole file, and converting to MP4 afterwards with its Remux Recordings command. Capture quality depends on your computer keeping up in real time, so close everything else while it records.
Route three: an online maker, with length limits
Template sites render the video for you, but their free plans cap the length and resolution, and your audio is uploaded to use them. Specterr's own page says its exports are rendered on its servers. These are the free-plan limits on each site's own pricing or help page in September 2026:
| Maker | Free plan | Paid, for longer or sharper |
|---|---|---|
| Specterr | 720p at 30 fps, up to 5 minutes, watermark, one video a day | Pro 1080p60, 10 minutes; Unlimited 4K60, 120 minutes |
| Kapwing | 720p, up to 4 minutes, watermark | Pro: 4K, 120 minutes |
| VEED | 720p, up to 10 minutes | Paid plans from 1080p to 4K |
| Canva | Up to 30 minutes at up to 1080p | Pro: 2 hours at 4K |
| Adobe Express | Up to 30 minutes, no 4K | Premium: 2 hours, 4K |
| Videobolt | No free plan | Lite 720p, 10 minutes; Pro 4K60, 1 hour |
Chapters for a long mix
For a mix or an album visualizer, chapters let viewers jump to a track. YouTube's help page lists the rules for adding them with timestamps in the description: the first timestamp must be 00:00, there must be at least three timestamps in ascending order, and each chapter must be at least 10 seconds long. Write the artist and track name on each line and the chapters also help people find the video by track name.
Shorts from the same session
A vertical Short of the best 30 to 60 seconds points viewers to the full video. The app re-renders in 16:9 only, so for a Short either record the hook again in the browser visualizer framed 9:16, or crop the centre of the 16:9 render in an editor, keeping the subject in the middle of the frame when you choose the picture.
Which route for which video
| Video | Best route | Why |
|---|---|---|
| A Short or a teaser | The browser visualizer | Free, 9:16 or 16:9, up to 60 seconds, nothing uploaded |
| One track, three to five minutes | The app's re-render, or a free online plan with its limits | Full length, 16:9, up to 4K at 60 frames a second |
| A one-hour mix or an album | The app's session re-render, OBS capture, or a paid online tier | Free online plans stop at a few minutes |
| A custom look you design | After Effects, or a visualizer captured with OBS | Full control of every element, no length limit |
For a single three-minute track, several free plans are enough if you can live with a watermark or 720p. For a one-hour mix, the paid tiers, OBS, or a re-render from the app are the realistic options.
In After Effects or DaVinci Resolve
If you already edit video, your editor may be enough. After Effects has two built-in effects for this, according to Adobe's help: Audio Spectrum, which draws the audio's levels across a frequency range along a path or a circle, and Audio Waveform, which draws the waveform. Both read the audio layer directly, and Adobe notes they ignore time remapping and effects on that layer, so precompose it if you need to. Combined with a photo and some keyframed motion, that is a classic visualizer with full control over the look and no length limit.
DaVinci Resolve's What's New page lists audio-driven Fusion animation, where the Fairlight Animator modifier drives any parameter from audio levels; its own example is animating eyes and lips. It can make a picture pulse with the music, though Blackmagic's page does not say whether it needs the paid Studio version, and there is no built-in spectrum visualizer we could confirm.
The routes also combine. A common workflow is to render the full song from the app or capture it with OBS, then bring the video into an editor to add the title, the artist's name, a lyric line or two, and the end screen, so each tool does the part it is best at.
Whichever tool renders the picture, keep a copy of the settings or the project. A visualizer that works for one track often becomes the look for the whole release, and reusing the same mappings and colours across an album gives the channel a consistent identity.
A checklist before you upload
- Render from the master. Use the final mixed and mastered file, not a rough bounce, so the visualizer matches what people hear.
- Export 16:9 at the frame rate you rendered. MP4, H.264, and the bitrate YouTube recommends for your resolution.
- Watch the whole render once. Check the start, the drop and the ending for drift or glitches before it goes public.
- Clear the music. Your own track, a licensed one, or the Audio Library; credit Creative Commons tracks in the description as YouTube requires.
- Make a thumbnail from the strongest frame. A clear, bright moment with the artist or cover art, not a dark average frame.
- Write a title and description people search for. Artist, track name and "visualizer" in the title; links and credits in the description.
- Cut a Short from the hook. A 9:16 version of the chorus points viewers to the full video.
After you upload
Check the video's page in YouTube Studio before you share the link: any copyright claim appears there, and a blocked video is better discovered by you than by your audience. Watch the processed version at its highest quality once, because YouTube's own encode can soften fine detail such as dither patterns and thin lines, and a slightly bolder look survives compression better. Then pin a comment or add links in the description to where people can stream or buy the track.
Where the usual advice breaks: 4K is not the upgrade that matters
Template sites sell the upgrade to 4K as the step that makes a visualizer look professional. For most visualizers, three other things matter more.
- Sync beats resolution. A 1080p video where every kick lands on a movement feels better than a 4K video that drifts. Viewers notice timing before they notice pixels.
- Frame rate beats resolution. Beat-driven motion at 60 frames a second looks smoother than the same motion at 30, whatever the resolution.
- Your own picture beats any template. Every template has been used on thousands of uploads. A photo from the shoot, the cover art or your own footage makes the video recognisably yours.
The honest limit of every route here, ours included, is that a visualizer is a way to present a track, not a substitute for one people want to hear. It helps a good song look finished and gives listeners something to watch; it will not carry a weak one.
Where to get it: free tools and the app
- Free live audio visualizer. In your browser: your song, your picture, the app's effects, recorded up to 60 seconds in 16:9, 9:16 or 1:1 with a small immer ground mark. Nothing is uploaded.
- Free VJ loops. 4K and 1080p loops made with ImmerGround's effects, CC0: backgrounds for any visualizer.
- BPM finder. Free, in your browser: the tempo and key of your track, to plan cuts on the beat.
- ImmerGround for iPhone, iPad and Mac. Our app, free to download; ImmerGround Pro is $6.99 a week or $39.99 a year. The whole song, recorded as you perform it, re-rendered in 16:9 at up to 4K and 60 frames a second.
What to do next
- Decide the length. A Short or teaser, a single track, or a long mix: that decides the route.
- Check the rights. Your own music, a licensed track or the Audio Library.
- Make a 60-second test in the browser. Try your picture and mappings before committing to a full render.
- Render the full version by the route that fits. The app, OBS capture, or an online maker's paid tier.
- Upload with YouTube's settings and a strong thumbnail, then cut a Short from the best moment.
.jpg)
.jpg)